- Savage Blog
- How to Find the Perfect Shotgun Fit with Renegauge
How to Find the Perfect Shotgun Fit with Renegauge


Proper fit is key for consistent and accurate shooting. Getting the fit of a shotgun right gives you a predictable platform and lets you focus where focus is needed, on your target. Getting your shotgun fit wrong can mean the difference between a crushing hit and a disappointing miss.
Why Shotgun Fit Matters
Once you have figured out your dominant eye and mastered shouldering your shotgun so you’re consistently mounting it, the final thing you need to consider is fit. Proper shotgun fit matters more than one would think. If your shotgun doesn’t fit, then you won’t shoot straight. One of the biggest variables in consistent and accurate shotgun shooting is how your eyes are lined up with the rib and front sight. If they’re not aligned properly, your point of aim and point of impact will vary.
Most off-the-shelf shotguns are designed for a truly average sized shooter. Even slight adjustments in the way your shotgun fits you can help increase accuracy and target acquisition. And that’s why we’ve designed the fully customizable Renegauge.
Customizing the Fit of the Savage Renegauge
Renegauge allows each shooter to make both large and small adjustments to the fit of their gun. Those adjustments are called drop and cast. Drop is the vertical adjustment made to a shotgun stock. Cast is the horizontal adjustment.
Renegauge has interchangeable recoil pads and cheek risers. It also comes with shims that help fine tune the small drop and cast adjustments. There are twenty unique ways that Renegauge can be set up, giving each individual shooter complete control over how they interact with the gun and customize their perfect shotgun fit. Let’s review each type of adjustment. Remember: Verify the firearm is clear of ammunition and the safety selection is in the full safe position.
Length of Pull
Length of pull (LOP) represents the sweet spot where your hand can reach the grip and trigger, and the gun can be shouldered effortlessly. LOP is measured as the distance from the face of the trigger through to the center of the gun’s stock to the middle of the butt.

A custom fit is crucial for accuracy. If your gun’s LOP is too short, you may feel cramped. If your LOP is too long, you may have difficulty shouldering the gun. The butt pad may snag on your shirt or coat. Worse yet, shooters may not be able to get their faces close enough to the breech to line up their shots.
Most guns spilt the difference when it comes to LOP and build guns based on averages. We know the importance of fit and developed the AccuFit stock in 2018 to let shooters customize their rifle fit. And we’re offering a similar adjustable LOP system on the Renegauge shotguns.
If you’re not sure how to measure your length of pull for a shotgun, check out this tip from Patrick Kelley.
Renegauge comes from the factory with the standard LOP recoil pad and insert installed, which is the shortest at 14.25”. The LOP can be increased up to 15” by swapping out the recoil pads.
| Recoil Pad | Length of Pull (inches) |
| Standard (Small) | 14.25 |
| Medium | 14.7 |
| Large | 15.07 |
Adjusting Renegauge’s LOP
To adjust the LOP on Renegauge:
- Remove the top and bottom screws from the recoil pad with a Phillips head screwdriver.
- Remove the recoil pad and insert.
- Swap it with the recoil pad and insert that fit you better.
- Attach with the appropriate length screws. Make sure to not overtighten them!
Renegauge has a more vertical grip than other semi-auto shotguns. It allows shooters with larger hands to shift lower on the grip for a firm feel, and shooters with smaller hands to shift higher – and still have a consistent length of pull on the trigger.
Pitch
Pitch is measured as an angle. Take the long line that extends from the rib and draw a perpendicular line down to the back end of the butt pad. The angle of the pad off of this new line is the gun’s pitch.

This angle may seem insignificant, especially considering how many variants there are. The key is to find an angle that distributes recoil evenly across the butt as it connects with your shoulder. If the pitch is too steep, the toe of the gun will dig in during recoil, and that can be painful.
Renegauge can be set up in many different configurations by changing the shim.
| Shim | Pitch (Degrees) |
| Standard | 6 |
| 1 | 6.43 |
| 2 | 6.9 |
| 3 | 7.3 |
Drop
There are four places to measure a shotgun’s drop – drop at comb, Monte Carlo, heel, and toe. These measurements impact how your eye aligns with the front sight vertically and determines whether your shots hit consistently, high, or low. If your eyes are too high and you’re looking “down” at the front sight, you’ll shoot under your target. Likewise, if your eyes are too low and you’re looking “up” at the front sight, you’ll shoot over your target.
The bottom edge of your iris should sit directly on top of the rib.

Adjusting Renegauge’s Drop
Renegauge comes from the factory with the standard shim installed, which offers the least amount of drop. To adjust Renegauge’s drop, you’ll replace the shim located between the grip and trigger. The shims are shaped like wedges that tilt the butt of the stock down slightly, increasing its drop.

- Visually ensure that the shotgun is clear of ammunition and place the Safety Selector into the Full Safe position.
- Remove the screws from the recoil pad. A small amount of oil placed in the screw locations will help not damage the gel recoil pad.
- Remove the recoil pad and spacer from the buttstock assembly.
- Using a deep 1/2” hex nut driver, remove the hex nut from the inside of the buttstock.
- Remove the bushing from the stock - it should fall out after the hex nut is removed.
- Remove the buttstock assembly from the receiver.
- Remove the installed drop shim from the receiver.
- Select the matching set of shim and bushing - note the holes on the bushings to indicate the number. It is important to use the correct matching set of bushing and shim.
- To add Cast-Off (recoil pad slightly to the right of center), the cast shim should have “CAST OFF” facing the receiver.
- To add Cast-On (recoil pad slightly to the left of center), the cast shim should have “CAST ON” facing the receiver.
- Place the bushing in the pocket inside the stock - it is shaped like the bushing. There are a couple of ways to do this:
- You can drop the bushing in and shake the stock around until the bushing lines up in the pocket.
- You can use a rod with a magnet at the end and then use another rod to hold the bushing down while you retract the magnet.
- You can install the bushing after the stock is on with a magnet.
- Place the drop shim on the back of the receiver - the cylindrical pins face the receiver, the tapered pins face rearward towards the stock. If the cast shim is being installed, it should be placed on the cylindrical pins of the drop shim. This will locate it between the receiver and the selected drop shim.
- At the factory, a small amount of removable threadlocker, Loctite 242, is used when assembling the nut onto the stock rod. This should be applied at the end of the threads on the stock rod.
- Slide the stock over the rod until it is flush to the receiver and shim. It is important not to dislodge the bushing from the internal pocket when sliding the stock over the rod. It is best to work with the stock rod pointing upwards so you can see the rod going through the bushing.
- After confirming that the stock is flush to the receiver and the bushing is seated properly in the pocket, install the hex nut to the stock rod until it is tight against the bushing and the stock is secure. We install the nut to 120 in-lbs. A magnetic driver may help with installing the nut.
- Place the recoil pad and recoil pad spacer on the back of the stock.
- Place oil in the recoil pad screw locations to prevent abrasion to the gel from the screwdriver.
- Install the recoil pad screws until the recoil pad and recoil pad spacer are secured to the stock with no gaps.
Drop at Comb
Draw an imaginary line from the rib on top of a shotgun to the very middle of the comb. The gap between that line and the top of the comb is measured as the Drop at Comb.
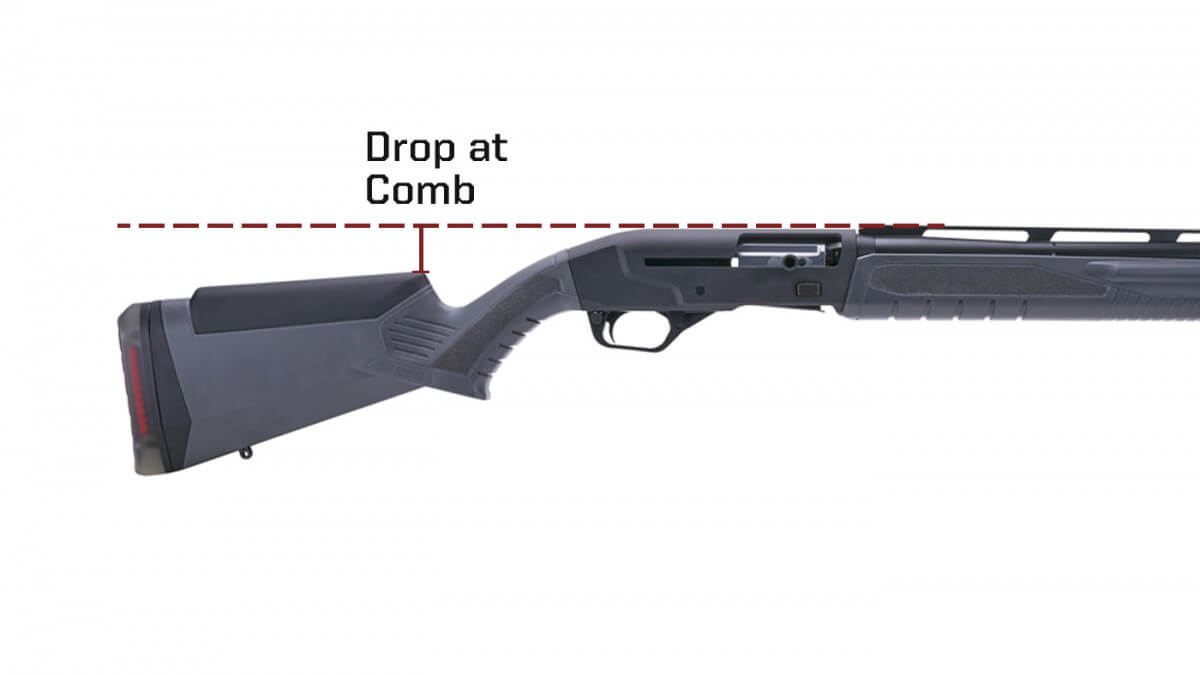
This is where the cheek weld comes into contact with the stock. From this position, the shooter’s eye should line up with the rib. A good fit here allows for a shooter to raise the gun in line with their eye, which should be perfectly aligned to pick up the target. If a gun’s comb is too high, shooters tend to miss high. To compensate, some will force their faces down, pressing into the gun. While this may correct the aiming issue, it may be painful during recoil. A low comb is problematic as well. Shooters may raise their heads above the stock. This isn’t stable and often results in shots that pass low of the intended target.
Renegauge comes from the factory with the standard cheek riser install, which is the lowest of the risers provided. To change Renegauge’s cheek risers:
- Grasp the cheek riser firmly with one hand and the stock with the other hand.
- Apply sideways pressure to the cheek riser until it unlocks
- Install the selected cheek riser by inserting the front of the riser into the stock
- Secure one side by placing it in the hole in the stock and firmly press down on the opposite side to lock it in place
Drop at Comb can be adjusted on Renegauge by using different cheek risers and shims.
| Cheek Riser | Shim | Drop at Comb (Inches) |
| Standard (Low) | Standard | 1.551 |
| 1 | 1.585 | |
| 2 | 1.620 | |
| 3 | 1.656 | |
| Medium | Standard | 1.544 |
| 1 | 1.578 | |
| 2 | 1.612 | |
| 3 | 1.639 | |
| High | Standard | 0.818 |
| 1 | 0.855 | |
| 2 | 0.896 | |
| 3 | 0.932 |
Drop at Heel
The heel of a gun is the corner of the stock closest to the shooter’s face. The Drop at Heel is also measured off of the straight line that would extend back from the rib.

A gun with a modest drop at the heel directs recoil straight back into the shoulder. A steep drop at the heel results in more muzzle flip during recoil, but the design of the stock may be easier to shoulder quickly.
Drop at Heel can be adjusted on Renegauge by using different recoil pads and shims.
| Recoil Pad | Shim | Drop at Heel (Inches) |
| Standard (Small) | Standard | 2.529 |
| 1 | 2.625 | |
| 2 | 2.730 | |
| 3 | 2.820 | |
| Medium | Standard | 2.563 |
| 1 | 2.662 | |
| 2 | 2.770 | |
| 3 | 2.863 | |
| Large | Standard | 2.600 |
| 1 | 2.700 | |
| 2 | 2.812 | |
| 3 | 2.908 |
Drop at Toe
At the bottom of the stock, away from the heel, is the toe. The Drop at Toe is measured using the same straight line extended back from the rib.

The Drop at Toe is a good gauge for how wide the butt of the gun will be. The length between the Drop at Toe and Drop at Heel will correspond with the width of the stock. Larger surface areas distribute recoil more evenly. Smaller stocks may be punishing during recoil, as there’s less mass to distribute the force across the shoulder.
Drop at Toe can be adjusted on Renegauge by using different recoil pads and shims.
| Recoil Pad | Shim | Drop at Toe (Inches) |
| Standard (Small) | Standard | 7.797 |
| 1 | 7.883 | |
| 2 | 7.983 | |
| 3 | 8.074 | |
| Medium | Standard | 7.914 |
| 1 | 8.009 | |
| 2 | 8.120 | |
| 3 | 8.202 | |
| Large | Standard | 8.047 |
| 1 | 8.141 | |
| 2 | 8.245 | |
| 3 | 8.336 |
Drop at Monte Carlo
Monte Carlo stocks typically provide a higher point for a cheek-weld on a stock that drops at the heel.

The resulting bump may add more mass but results in a stock many find very comfortable to shoot. Adding higher cheek risers to Renegauge cuts the drop at its Monte Carlo.
| Cheek Riser | Shim | Drop at Monte Carlo (Inches) |
| Standard (Low) | Standard | 2.057 |
| 1 | 2.140 | |
| 2 | 2.230 | |
| 3 | 2.307 | |
| Medium | Standard | 1.468 |
| 1 | 1.549 | |
| 2 | 1.638 | |
| 3 | 1.714 | |
| High | Standard | 1.337 |
| 1 | 1.417 | |
| 2 | 1.506 | |
| 3 | 1.582 |
Cast
Cast is the measurement of the central line of the gun and the stock’s butt. If the butt is tilted slightly to the left of the central line, it’s called “cast on”. If the butt is tilted slightly to the right of the central line, it’s call “cast off”.

If the cast is slightly wrong, you’ll tend to miss your shots side to side. If your eyes are misaligned by even a ¼”, that becomes nearly 6 feet at 30-40 yards. Big miss.
The key here is that when the shotgun is shouldered, your eye should be centrally aligned with the front sight without pushing your head one direction or the other.
Adjusting Renegauge’s Cast
When you adjust Renegauge's drop, you can also add a shim to Cast Off or Cast On:
- To add Cast-Off (recoil pad slightly to the right of center), the cast shim should have “CAST OFF” facing the receiver.
- To add Cast-On (recoil pad slightly to the left of center), the cast shim should have “CAST ON” facing the receiver.
